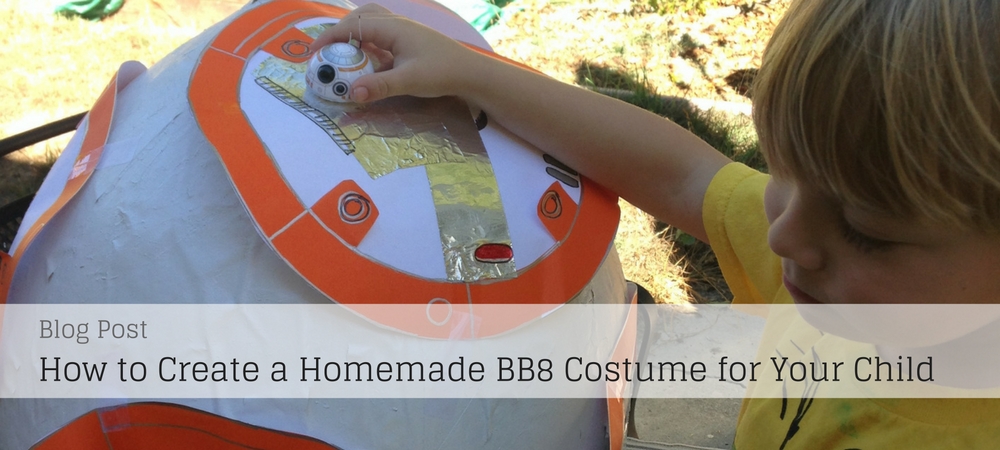
If your child is anything like Zoom, they really love BB8 from the Star Wars: The Force Awakens. Even before the movie came out last year, my son was asking if he could be BB8 for Halloween. This was 6 weeks before the movie was even released and there was very little out about BB8, so I knew it would be tricky to find the costume (if it even existed). I am quite a creative person so if I have time, I usually prefer to make my own costumes anyway. Not only do I enjoy making them, but I also love searching online for ideas as you find some really funny ones, like this Pam Beesly (The Office) outfit – how brilliant is that?! So I decided that I would give a homemade BB8 costume a go. I’m excited to share how to create it for your child!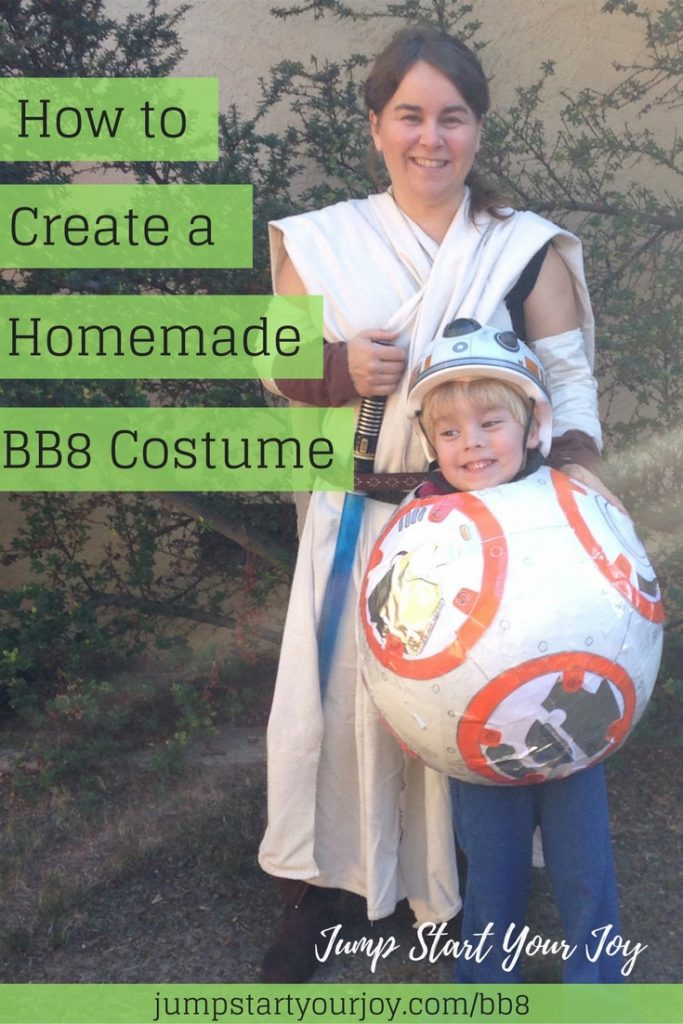
The body of this costume is made from Paper Mache. It’s not that hard to do, but, a word of warning, it does need time to dry, and because of that, the costume is not a good “last minute” creation. I’d plan to allow for 10 days between when you start this project and when it’s supposed to be worn.
Here’s everything you need to know to create your very own BB8 costume for Halloweeen.
The BB8 Costume Shopping List
Here’s a shopping list of everything you need, first, so you can see what’s involved. Instructions are after that. 😉
I’m sharing Amazon links so you can see what each thing looks like. If you choose to buy via Amazon, I’ll get an affiliate payout (at no extra cost to you, thank you!), but you may be able to find most of these things at a Target, Walmart, or hardware store near you, except for the large balloon and the bike helmet.
Supplies for Creating BB8’s Body
A large 36′ inch ROUND balloon – you’ll need to buy something much larger than a standard balloon, and it needs to be round, to match the shape of BB8. I found my balloons on Amazon, and yes I bought 3. While you may only need one, your kids will love a giant balloon if you have some left over.
Flour and Water – just regular grocery store variety flour works
A Mixing Bowl – a larger bowl is a good idea
Paint Brush – I used a narrow one like this one on Amazon.
Paper strips that are torn, not cut – I used large Mala Drawing Paper roll from IKEA for this (this is a link for reference, it’s way cheaper at IKEA). Newspaper works, too, but I was worried about the grey color being hard to cover, later, when I painted.
Somewhere to hang your balloon (see picture below, I used a broom handle and two chairs, with tape to hold the handle in place)
String – to tie the top of your balloon to the broom handle. We used garden twine.
Fans – to help your drying time
Patience – you’re doing three layers of this 😉 Summon your inner Yoda and Use the Force.
Supplies for Detailing the Body
High Gloss White Spray Paint like this one from Amazon
Orange Origami squares (I used these) or orange construction paper
Clear Scotch tape
Silver Metallic Sharpie
Black Sharpie
Blue Sharpie
Red Sharpie
Aluminim Foil duct tape (available at hardware stores)
White paper (printer paper) for the center of each BB8’s orange circles
Clear Packaging Tape
Scissors
Dinner Plate
Paper Dinner Plate (you need one about two inches smaller in diameter than your dinner plate)
For BB8’s head: A bike helmet (you really need this to finish off the look)
Creating BB8’s Body out of Paper Mache
Before starting, measure your child at the shoulders, all the way across their back. You will need to get your balloon blown up wide enough so that the child will fit inside, and so your balloon needs to be at least 6 inches wider than the total width of your child’s shoulders. You want this thing to be kind of roomy once they are wearing it, as your child’s arms will go inside of the costume. I would suggest that as you are blowing it up the balloon, you hold it up to your kid. You’re aiming for full coverage here; ideally the sphere should cover their shoulders at the top, and hit the upper thigh below. The actual size of your balloon will depend on your child’s height and width. Note that as the wet paper mache dries, it will shrink a bit, so I suggest going slightly larger than you think you will actually need.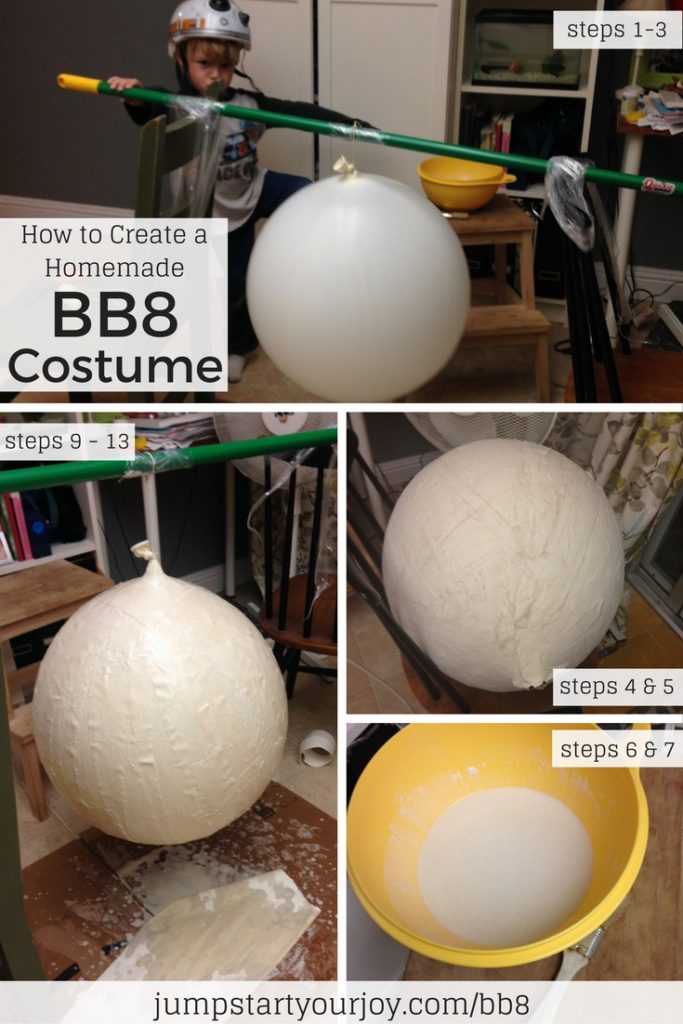
Steps to create the Paper Mache Covered Balloon
1. Tie off your balloon once you have it blown up to your desired size (and note that you need a very large, special sized 36 inch balloon for this project).
2. Set up your drying station (this is also where you’ll be doing the mache). We used two kitchen chairs, a broom handle and garden twine to set up our station.
3. Tie a piece of string to the top of the blown up balloon, and fasten it on to your drying station.
4. Place a lot of newspaper below the balloon. Consider a tarp or cardboard. This will get messy.
5. Rip your desired craft paper or newspaper into 1.5 to 2 inch strips, and make them long. A couple of feet long or more. Make a lot. I didn’t keep track, but you’re going to be covering the balloon twice.
6. Mix your water and flour (see the recipe here) in your largest mixing bowl.
7. Dip your first piece of torn strip into the glue (water and flour). You may want to start soaking more pieces in the glue, and then allow some of the excess glue to drip off before you add it to the balloon each time. You’ll need to dip every piece in the glue before putting it on the balloon. (Yes, glue acts as important stuff here, which is why you might want to check out a great read about how the glue is manufactured).
8. Place each strip on the balloon and smooth it out.
9. Keep placing strips on the balloon, each piece should touch another one. I put mine on length-wise, from the bottom to the top, but you need to make a random pattern so the mache has strength. You can put some strips going side to side, so there is a lattice. But the majority of the strips should go top to bottom.
10. Cover the bottom and the top, except for the spot where the balloon was tied.
11. Do a second layer, now, before the paper mache dries.
12. Because this thing is BIG, it will need to dry at least a full day before you put on the next layer. You may need to wait 48 hours. The shell should be hard (but do not play with the balloon or try to pull it away from the mache until the very end. It can pop, and then you may have to start over). You can leave this drying, with fans pointed towards it.
13. Do this at least one more time, and preferably two, so that you have 3 separate applications of the strips on the balloon. Let the damp balloon dry.
14. Once it’s REALLY dry, it will have lightened in color, and feel very hard. If it’s mushy, it’s not dry. Be patient. Once it’s hard and dry, it’s time to paint it white. I suggest leaving the balloon hanging from the pole (take it outside) when you paint it. It will be easier to paint using this same set up.
15. Spray paint with a glossy white spray paint (I used this one), let it dry, and go back until you have consistent coverage.
To Decorate your BB8 body
Once you have the paper mache done, it’s time to decorate. Here’s what I did:
16. Create the 6 circles for BB8’s body. This is the hardest part of this project, and requires the most detail. BB8 is somewhat like a soccer ball, and he has 6 circles on his outer shell. The 6 orange circles all have the same outer pattern, but the interior of each is different. (If you want to download photos of the 6 different circles, so you can see the details, there’s a link at the bottom of the post where you can get all of the info plus those photos emailed to you.) I will tell you how to create a template for the 6 outer rings, and you will need to take some artistic license with the inner work. Have fun with this; it’s the attention to detail here that will make this a great costume.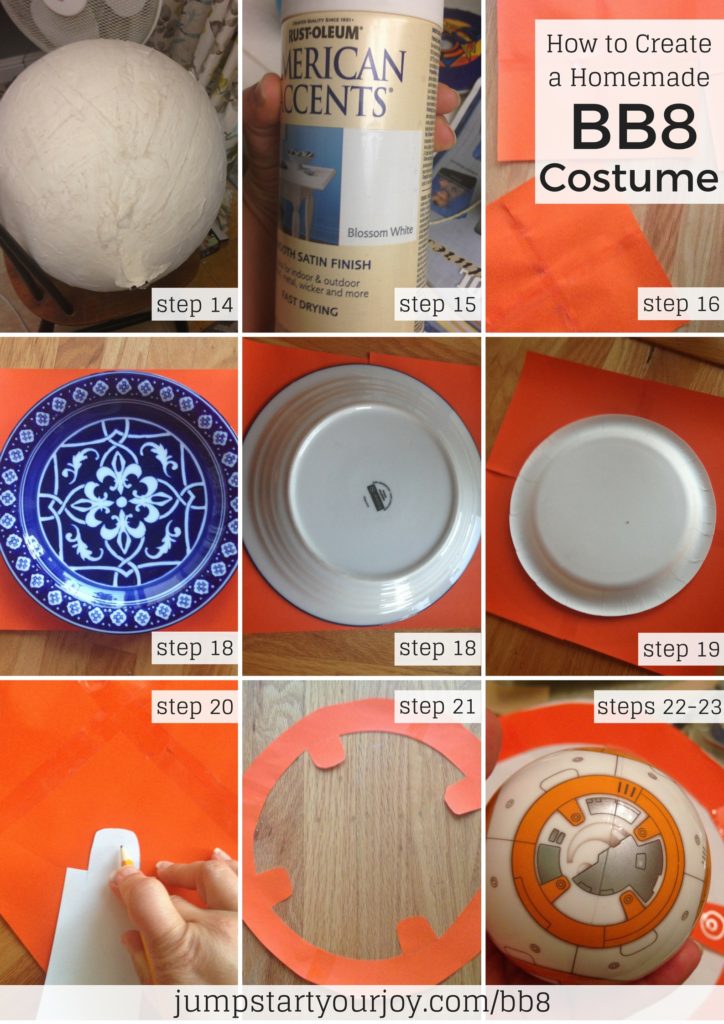
To Make the 6 Circles on BB8’s body
17. You’ll need to create 6 12x12inch orange paper bases for the 6 circles on BB8. This is a bit of a pain the butt; I could not find this size paper, so I ended up taping together origami squares, or you could tape together two pieces of construction paper to get a large square piece of orange paper. Ultimately, you need 6 12×12 size sheets of orange paper.
18. Take your dinner plate (needs to have a 12 inch diameter), trace and cut out a 12 inch circle from each of the 6 sheets.
19. Using a slightly smaller plate (I used a paper dinner plate), TRACE (do NOT CUT) an inner circle on each of the orange circles.
20. Note that on each of the orange circles, BB8 also has 4 little rounded points pointing inward. Create a 1.5 long X 1 inch wide template, and round one of the tips. TRACE these four times in each of the circles, with the rounded tip pointing towards the center. You can put these at the “North” “South” “East” and “West” points on the circle.
21. With the inner circle and 4 points completed, now it’s time to CUT each of the 6 orange circles out. You may need to re-tape as you go.
22. Tape or glue each of these orange circles to a white piece of 12×12 paper, so that each has a solid white background.
23. Using BB8 as an example (or sign up at the bottom of the post to get images of BB8), create varied internal patterns within each of the 6 circles. Use the aluminum foil tape, metallic silver Sharpies, Blue and Red Sharpies, and Black Sharpies to fill in the details.
Adding your Orange Circles to the Paper Mache Sphere
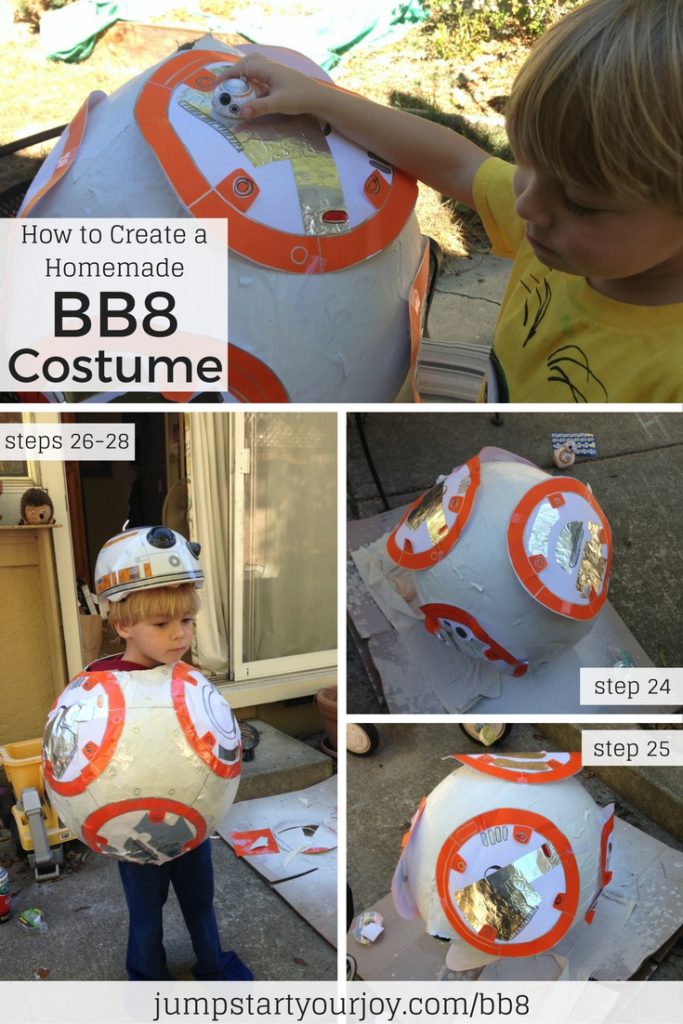
24. Once your sphere is dry and your orange circles are complete, it’s time to put the 6 orange circles on the body. I recommend using the plain scotch tape to loosely attach each of the circles to BB8’s body so that you can get the spacing right. What I found was that my paper mache was not perfectly round, and so I had to move the orange circles a few times to get the spacing to look right.
25. the “top” of the costume (where your child’s neck will go), is where the hole from the balloon is. I would avoid putting one of the orange circles directly over that hole, as you will be cutting it before you are done.
26. Tape the circles down. After getting the circles where you want them, you will be using the clear packaging tape to “permanently” place each of the circles on the paper mache body. Use plenty of tape, and cover each circle. This will give the paper a glossy sheen, and make sure that nothing starts to peel off while your child is out trick or treating.
At this point, your costume is complete except for cutting the holes for your child.
Cutting the holes for your child
27. Cut the hole for the head. The head will now go wherever the top hole (where the balloon was poking out). You will need to cut this to make more room for your child’s head, but do not cut it too much. You want you child’s head, but not their shoulders, to fit through this opening.
28. Cut the hole for the legs. Opposite of that hole, you will cut a larger hole, that will sit around their thighs, or stomach / bottom. This needs to be wide enough for their shoulders to pass through (which should be wide enough for their hips, as well).
– there are no arm holes in this costume. You could cut one if you like, but because BB8 is a sphere, my son asked that he did not have an arm holes. Safety disclaimer: This meant I had to walk with him to carry his candy bucket, and to make sure he didn’t fall and hurt himself. Because it’s nearly impossible for a small child to see their feet in this costume, it’s also makes it difficult for them to maneuver. Please chaperone your child if they are wearing this costume; it is not safe for you to let them go out on their own. Even just getting bumped into may mean that they get knocked over, and without having their arms out to catch themselves, they may get hurt and have no way to get up without assistance.
Finishing touches – BB8’s head
29. BB8’s head – we used a bike helmet as the top portion of BB8. You can purchase it at Target, or from Amazon here. The bonus is that my son still uses it when he rides his bike.
– dress your child in dark pants so that they costume stands out on it’s own
Additional thoughts
– the inside of the paper mache does flake off. If your child is gluten intolerant or celiac, look at this link for gluten free ways of making paper mache. It is highly likely that they will breathe in particles of the costume.
– it seems obvious, but I would not wear this out in the rain. Water will likely destroy the paper mache.
– it may be safer to cut one arm hole for your child, in the middle of one of the 6 circles. Now that the movie is out, we know that BB8 can open up portions of his body. I would definitely have felt better if my son had one arm out, both to carry his candy bag, but also to catch himself if he fell.
– Just for fun:
BB8 Crocs, for shoes (my son loves these)
Let me know if you give this costume a go! I’d love to see pictures or posts about it if you create a paper mache BB8 costume. Happy Halloween! May the Force Be With You!

