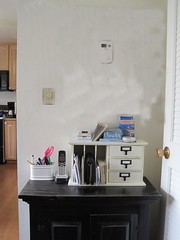
 We used to have this strange blank space in our dining room, in one of those awkward spots; large enough for a small piece of furniture, yet, the wall space has both a thermostat and a light switch on it. Every time I looked at that wall, I knew I wanted a bulletin board above that little black sideboard, but I couldn’t figure out a way to hang it with those two eye sores on the wall. It bugged me for weeks. (This is an approximate “before,” I won’t even try to lie, this is photoshopped.)
Then I got this idea to fake a bulletin board around the thermostat and light switch. I decided to dismantle a bulletin board that used to be in our bedroom, and re-purpose it. You might remember that bulletin board from this post. The old girl cost about $15 after I DIYed it!
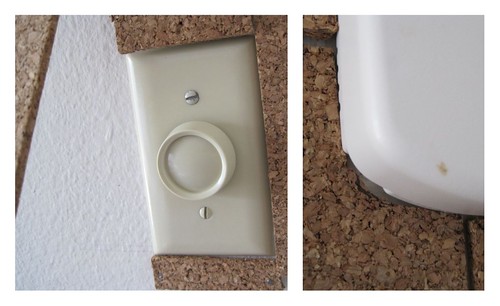
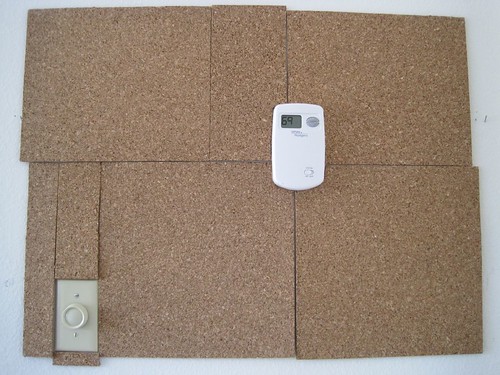
I drew out the basic height and width I wanted the board to be, by using the frame I had as a guide. Then I bought some cork (it comes in 12×12 inch squares) from Target, and nailed them on the wall in that space. I cut the cork to fit around the light switch and the thermostat. It already looks so good, but I’ll just have to make sure that the light switch doesn’t start sparking or become faulty due to the board that’s going to be fitted around it. This could mean that there is a further problem with the electrics, and contacting somewhere like Aardvark Electric, (aardvark-electric.com/electrical-services/outlets-switches/) will be my only solution, especially if I want everything to be working as it should again, as well as having my vision for a bulletin board come to life. But anyway, onto the next step.
Here’s what the space looked like after I’d finished with the cork. It doesn’t matter that the outline is a bit messy because that is about to get covered up by the frame.
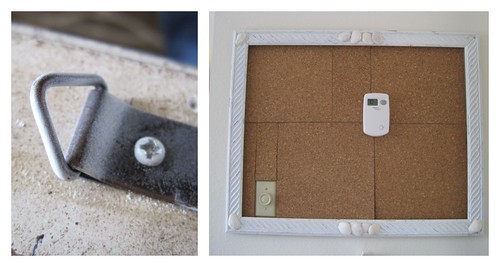
I nailed a couple of nails on either side of the cork to match up with the hangers in the frame. This allows the frame to hang around the cork. See, now the messiness is all covered up!
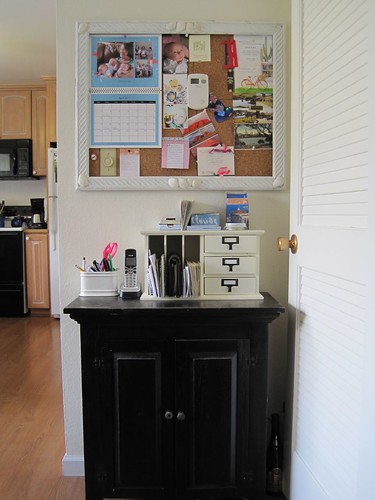
Once that was all done, decorated my bulletin board with a calendar and other essentials, turning this area into a little command center in this awkward space sitting right near the kitchen.
Now our phone, mail “stuff,” scissors, pens, all have a home! I got that little mail sorter at HomeGoods for about $20.00 and that cute pen holder? It’s a toothbrush holder from Walmart that cost about $8. I love how it looks there, and it keeps everything handy. And, the black cupboard was a FREE “roadkill” item, it was discarded in our last apartment complex and we picked it up.
I’m so excited that I found a way to get a bulletin board into this space, and I love how the light switch and thermostat just blend in with everything else going on there.
I linked this post to:
http://todayscreativeblog.net/
http://bellabeforeandafter.blogspot.com/
http://linda-coastalcharm.blogspot.com/
http://thrifty101.blogspot.com/

Comments
7 responses to “Faking a Bulletin Board in the Dining Room”
What a creative use of that wall space. I wouldn’t know what to do with that wall if it was me!
How creative! It looks very good!
I agree, what a great use of space! Nice job. 🙂
I’d love it if you linked up at DIY Thrifty Thursday @ Thrifty 101 http://thrifty101.blogspot.com/2011/04/diy-thrifty-thursday-12.html
Hope to see your amazing ideas soon!
Michelle
Thanks ladies! It was a fun experiment, and I’m just hoping our landlord doesn’t flip when he sees it 🙂
I love this space! Very clever idea with the bulletin board!
Thank you for stopping by my blog 🙂
-Jen
http://www.dishesandsocks.com
This might just be the cleverest idea ever! Well done, a great, fresh inspiration. Straight to my pinterest!
Hey Paula,
You girl, did such an incredible job covering up that annoying thermostat. We all have to deal with one thing or another, ruining an otherwise perfect wall, and now you showed us how simple it is, to just work around it. DUHHHH!!! he he.
I loved it so much I FEATURED you, I hope it puts a smile on your face.
Come grab a button girl, and display it proudly!
**Features from week #33 & #34** @ Bella Before and After
Thanks girl 🙂
Hugs,
Bella